
Introduction: This Tutorial gives a walk through installing and configuring VMware Server for Linux on a Suse 10.0, 10.1, 10.2 host operating system with particular attention to some of the fine detail that puzzles a new Linux user like me. I cobbled this together from the work of others who installed earlier VMware software and thus created a contemporary HowTo for Suse 10.0, 10.1 and the new Vmware Server. See Credits at the end.
Prerequisites:
Have your Suse install CD/DVD/source ready
The following packages are assumed to be already installed:
kernel-source
gcc
gcc-c++
make
You will need the VMware RPM package which can be downloaded from this Link to VMWare server download
Don’t install it at this stage, just save it. The package I used is Vmware-server-e.x.p-23869.i386.rpm. but time has passed & you’ll get a different version now.
Preparation:
Update the kernel if necessary: Use (Yast’s) Online Update to accept any kernel updates before installing or configuring VMware server. If you do not, you will likely need to reconfigure at a later date when a kernel update is installed. This is not difficult but might as well be done before the fact.
Use Yast to check the needed packages have been installed. If not then install them from the Suse DVD (or other source).
Register for [free] VMware server to receive your software key by email.
Check package installation and kernel consistency: Open a command line as root. Then issue the command rpm -qa kernel* gcc* make. This checks for installation of the packages that you need: kernerl-source, gcc, gcc-c++ and make. Further it allows you to see whether kernel modules are of the same version. It is crucial that they are of the same version. I received these responses to the commands:
gertrude@linuxtest:~> su
Password:
linuxtest:/home/gertrude # cd /
linuxtest:/ # rpm -qa kernel* gcc* make
kernel-default-nongpl-2.6.13-15.8
make-3.80-188
gcc-4.0.2_20050901-3
gcc-c++-4.0.2_20050901-3
kernel-default-2.6.13-15.8
kernel-source-2.6.13-15
kernel-update-tool-0.9-10
linuxtest:/ #
This states that I do have the applications make, gcc-c++, gcc and kernel-source installed.
Note the inconsistency in the versions highlighted in bold. You must fix such a situation by downloading & installing the updates. Then you get something consistent, like this:
gertrude@linuxtest:~> su
Password:
linuxtest:/home/gertrude # cd /
linuxtest:/ # rpm -qa kernel* gcc* make
kernel-default-nongpl-2.6.13-15.8
make-3.80-188
gcc-4.0.2_20050901-3
gcc-c++-4.0.2_20050901-3
kernel-default-2.6.13-15.8
kernel-source-2.6.13-15.8
kernel-update-tool-0.9-10
kernel-bigsmp-2.6.13-15.8
linuxtest:/ #
Note: Don’t look for the same version numbers that I have. They change with time.
A few more commands still as root and the preparation is complete:
gertrude@linuxtest:~> su
Password:
linuxtest:/home/gertrude # cd /usr/src/linux
linuxtest:/usr/src/linux # make mrproper; make cloneconfig; make modules_prepare
etc
etc
etc
.
etc
(finished when this prompt comes back):
linuxtest:/usr/src/linux #
Install VMware Server:
Right click on package VMware-server-e.x.p-23869.i386.rpm and select install with Yast.
Configure VMware:
When Yast finishes open a terminal as root, change to /usr/src/linux and enter vmware-config.pl:
Password:
linuxtest:/home/gertrude # cd /usr/src/linux
linuxtest:/usr/src/linux # vmware-config.pl
You will be asked to accept the licence agreement. Press enter and the space bar to scroll through, reading carefully. At the end press q. Then enter the word yes. At this point the actual configuration starts and you can accept the defaults by simply pressing enter at each question. You will also need to enter your software key (obtained by email) using the correct case.
I pressed enter for all questions except this one: in which directory do you want to keep your virtual machine files? I found on the first install that I was frequently bothered by disk-nearly-full problems if I accepted the default because the default is a subdirectory within the Linux root filesystem. After constructing a few virtual machines the Linux host partition filled up. So I uninstalled, started again and before installing VMware I created a new partition for the virtual machines’ file systems and entered the path to that in response to the question about virtual machine directory files.
Finally, after entering the software key, you should get this sort of message “The configuration of VMware Server 1.0.1 build-29996 for Linux for this running kernel completed successfully.” (changes with time) and you can then exit.
At this point you can install host virtual machines. I installed Windows 2000 Pro for everyday use because one doesn’t have to go through that incredibly irritating Microsoft activation nonsense with Win2K. Pop an install CD in the drive and have a good one!
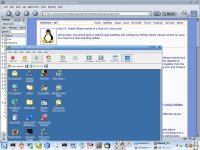
Here’s a pic of Windows 2000 running in a minimised window as a guest operating system on my Suse 10.1 desktop. As my grandson would say: Cool!!
Finished: YahooCredits: I cobbled this together from the following articles: